Our kitchen table is 10 1/2 years old and looks it! It has seen better days that's for sure!!! I have had a table idea in my mind for about 6 months now so back in October 2011, I decided to make some plans for Dan to build it (which he is awesome at!) and then I would paint and distress it. It ended up being a bigger project than I thought though, which every project seems to turn out that way :)!
He built the top from wood we purchased at Lowes - pine wood since it distresse easily.
Then he built the skirting. The legs were a little bit harder to find . . . I didn't care for the size at Lowe's, and ordering the legs online was EXPENSIVE!!! ($60 per unfinished table leg!) So, then I remembered Craigslist- I actually got really really lucky and found a guy in Greer who had a lot of unfinished farm style tables listed. And after emailing him he allowed me to just purchase the table legs - YAY!!!!
Here is Dan putting the unfinished table together ~
For the top of the table, we literally beat it to distress it . . . we used a hammer, wire brush, chain and sand paper. It was very stress relieving!!!
Then I wiped it with a clean cloth and gave it a good coat of dark walnut minwax stain on the top and underneath.
I distressed it again on the edges using a medium grit sand paper. And repeated the process of wiping with the clean cloth and lightly restaining those sanded areas.
I let it dry for several days and then coated it with 3 good coats of satin poly clearcoat (sanding with a very fine sand paper in between coats). Make sure to let each poly coat dry for at least a day (we let it dry for 2 days in between). We gave the underneath side one good coat.
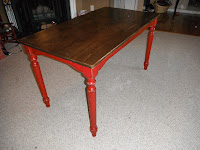
This was the finished product of the top of the top ~


No comments:
Post a Comment