Ever purchase a breakable or picture frame and the price tag had been put right on the front of the item or on the front glass of the picture frame??? Ugggh!!! I bought a cute platter on the clearance isle at Ross' over the weekend and sure enough, I couldn't get the price tag off. UNTIL I got out my mayonnaise and rubbed it on the sticky goo! That's right, mayonnaise!!!!
It's easy, simply rub it all over the sticky goo and let it sit for a few minutes and then rub it off. It got ALL of the sticky goo off in one swipe!
Sure wish I had known that trick when we bought a china cabinet 4 years ago and they taped the entire front and sides glass with maskingtape . . . .
Tuesday, April 10, 2012

Monday, April 9, 2012
Time to clean . . . . better for you and the environment!
We've been busy busy busy with various projects . . . all of them are still in the works so I hope to finish a few soon and post some pics :). Gotta love projects!!!! I sure do!
I've been experimenting a little with homemade cleaners. I use to make my own detergent for the wash machine so why not expand that into some easy, better for you and the environment and cheaper on your wallet homemade cleaners!
Today's post is a super easy and cheap Glass Cleaner ~
The items you will need are as follows:
1/4 cup of rubbing alcohol
1/4 cup of white vinegar
1 tbspn cornstarch
2 cups of warm water
1 spray bottle - you can purchase these on the cleaning isle at Target or Walmart or just use an old Glass Cleaner bottle like I did- rinse it out well with warm water.
Simply dilute the cornstarch in your warm water and then pour it into the spray bottle along with the other 2 ingredients and shake to mix well.
Make sure you shake well each time before using so that the solution mixes well and this also helps the sprayer to stay unclogged.
Want another neat tip for cleaning windows and glass? Crumple up an old black and white newspaper sheet and wipe the cleaner off with that instead of a rag. It makes is sparkle and shine!!!!
This glass cleaner costs about .50 per bottle to make and is non-toxic and better for you . . . not to mention the SpArKly mirrors and windows you now have :)!
More cleaning posts to come!!! Stay tuned!
I've been experimenting a little with homemade cleaners. I use to make my own detergent for the wash machine so why not expand that into some easy, better for you and the environment and cheaper on your wallet homemade cleaners!
Today's post is a super easy and cheap Glass Cleaner ~
The items you will need are as follows:
1/4 cup of rubbing alcohol
1/4 cup of white vinegar
1 tbspn cornstarch
2 cups of warm water
1 spray bottle - you can purchase these on the cleaning isle at Target or Walmart or just use an old Glass Cleaner bottle like I did- rinse it out well with warm water.
Simply dilute the cornstarch in your warm water and then pour it into the spray bottle along with the other 2 ingredients and shake to mix well.
Make sure you shake well each time before using so that the solution mixes well and this also helps the sprayer to stay unclogged.
Want another neat tip for cleaning windows and glass? Crumple up an old black and white newspaper sheet and wipe the cleaner off with that instead of a rag. It makes is sparkle and shine!!!!
This glass cleaner costs about .50 per bottle to make and is non-toxic and better for you . . . not to mention the SpArKly mirrors and windows you now have :)!
More cleaning posts to come!!! Stay tuned!
Wednesday, February 8, 2012
Building Character Chart . . .
Being a mom of 4, I feel like I take two steps forward one week and then 4 steps back the next week in the area of discipline, kindness and good character. I am always looking for creative ways to speak character into my kids.
I found this on etsy.com and LOVE the idea!

Kids are pulled in so many different directions in today's society- to put self first and to follow what's cool and not necessarilly what is right. This little chart is neat to help build different positive qualities in your child (and I am sure as moms we can learn a lesson or two ourselves!).

It is a children's character building chart. The cool thing is you can purchase it if you aren't crafty like that, or if you like to save money and make your own, then that is also an option.
Here is the link to the chart: http://www.etsy.com/listing/82770185/childrens-character-building-wall?image_id=275284513
She has other images on there that help explain it as well.
So, get busy and go build character!!!!!!!
Friday, January 27, 2012
Photo Wall Squares - this weekends project!!!

So, my last post was a fun (cute and cheap!) wall decor project!!! As I have said, I LOVEEEEE to be crafty, but the craft has to have a purpose and a place. Well, I still haven't decided if I wanted to make the wall squares for my office room to replace a picture wall collage I have had on my wall for some time, or in my dining room that is waiting to be redecorated. So, when I saw this AWESOME take on this cute project I knew exactly where I wanted to put it. My girls room has a decent size wall where a baby canvas is hanging that I painted for above Camille's crib. Well, needless to say, the crib has been moved out since 2010 and has been replaced with a kitchen playset. I have been wanting to remove the canvas and redecorate that wall for sometime . .. ok, for a LONG time and this project just hit the spot! I just love it (and did I mention it too is cute and cheap to make!?!).

Check out this blog by Jeni. She has some really cute ideas on here.
http://jensidea.blogspot.com/2011/12/photo-block-art.html
I can't wait to go get my crafty goods and begin this fun and cute (and CHEAP!!) project :)!!! I will definitely post some pics when it is finished.
Friday, January 20, 2012
Easy Cheap Wall Decor Idea . . .
So, I love to craft, and I love to decorate but it seems these days there is little time for either!
However, this neat crafty wall decor idea is one I will be trying very VERY soon :)! Maybe even tomorrow while the boys of the house are having a daddy/son day.
I have this large wall space in our office room that I have wanted to redo for a month or two. I saw this neat and cheap make-it-yourself wall idea and it hit me that that's what I wanted to try for this space!

Items you will need:
1' x 10' shelving board from Lowe's (they can cut it down for you if you ask them into 12"x12" squares).
From Hobby Lobby or Michaels purchase 9 pieces of 12x12 scrapbook papers that coordinate. For my project I will be using Blacks, reds, creams and gray. All 9 pieces should blend and coordinate.
1 tube of dark colored paint that coordinates with your paper. Stick with Black or Espresso Brown or Navy.
1 foam brush to adhere paint to wood edges.
Spray Adhesive or Watered down craft glue.
Distress Ink to distress the edges of the finished product.
9 picture hangers.
Instructions:
Paint your 12x12 cut wood pieces with the dark colored craft paint you have purchased.
Allow to dry for 30 minutes or so.
You might need to add another coat depending on the coverage.
Take and lay out your 9 boards and spray the boards with the adhesive or apply glue. Be careful that you don't allow your paper to ripple or tear. If you are using the spray adhesive, use it on a protected surface and in a well venhilated area.
Apply the paper to the surface. Do this for all 9 boards.
Allow to dry well.
Take your Distressing ink and rub it on areas of the edges.
After this part has dried, attach your hanger to each piece and . . .
TaDa! you have some neat artwork for under $20!!!

However, this neat crafty wall decor idea is one I will be trying very VERY soon :)! Maybe even tomorrow while the boys of the house are having a daddy/son day.
I have this large wall space in our office room that I have wanted to redo for a month or two. I saw this neat and cheap make-it-yourself wall idea and it hit me that that's what I wanted to try for this space!
Items you will need:
Instructions:
TaDa! you have some neat artwork for under $20!!!
Thursday, January 19, 2012
'I spy' a fun project with kids!!!
This is a fun hands on cheap and easy craft to do with your kids and it is useful after you make it (we love crafts that are useful!)!! It's an "I Spy" bottle.
First of all here are the items you will need:
1 empty clean DRY plastic bottle
a bag of cheap white uncooked rice
funnel
large bowl
small items from around the house that will fit inside the bottle mouth (use 10-15 items)
glitter (optional)
hot glue gun
a 6" strip of ribbon
paper to list the items on
hole punch
Empty the rice into a large bowl. Have your child hold the clean/dry bottle over the bowl and fill the bottle with several scoops of rice using the funnel.

Add in 3 of your items - make sure to keep a list of the items. And if you use several of the same items make sure you write down colors.
Add a few more scoops of rice.

Add in several more of your trinkets.
Add in glitter (optional) - the glitter just gives it a fun look! We call it the magical dust. :)
Keep layering, making sure to keep a list of all the items you put into the bottle.
Only fill the bottle to the neck so that there is plenty of room to shake.
Once your bottle is filled and complete, squeeze glue from your hot glue gun around the mouth of the bottle and quickly screw on the lid tightly. Go ahead and tie ribbon around covering the overlapping glue.
Cut out a rectangular piece of paper and type or handwrite the items inside and enjoy finding all the goodies!!!

Saturday, January 14, 2012
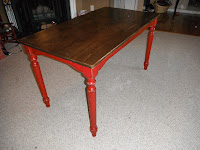
My first furniture project - table complete!
Our kitchen table is 10 1/2 years old and looks it! It has seen better days that's for sure!!! I have had a table idea in my mind for about 6 months now so back in October 2011, I decided to make some plans for Dan to build it (which he is awesome at!) and then I would paint and distress it. It ended up being a bigger project than I thought though, which every project seems to turn out that way :)!
He built the top from wood we purchased at Lowes - pine wood since it distresse easily.
Then he built the skirting. The legs were a little bit harder to find . . . I didn't care for the size at Lowe's, and ordering the legs online was EXPENSIVE!!! ($60 per unfinished table leg!) So, then I remembered Craigslist- I actually got really really lucky and found a guy in Greer who had a lot of unfinished farm style tables listed. And after emailing him he allowed me to just purchase the table legs - YAY!!!!
Here is Dan putting the unfinished table together ~

For the top of the table, we literally beat it to distress it . . . we used a hammer, wire brush, chain and sand paper. It was very stress relieving!!!
Then I wiped it with a clean cloth and gave it a good coat of dark walnut minwax stain on the top and underneath.
I distressed it again on the edges using a medium grit sand paper. And repeated the process of wiping with the clean cloth and lightly restaining those sanded areas.
I let it dry for several days and then coated it with 3 good coats of satin poly clearcoat (sanding with a very fine sand paper in between coats). Make sure to let each poly coat dry for at least a day (we let it dry for 2 days in between). We gave the underneath side one good coat.
This was the finished product of the top of the top ~

For the table skirting and legs . . .
We picked out a red - a darker rich red.
I gave the entire body 4 to 5 good coats of the red paint, letting each coat dry well inbetween.

I then used a medium grit sponge sander ($5 for a 2pk at Lowe's) and began to age the legs.
To give it the really aged look I took the dark walnut stain that I used on the table top and with a small canvas style paint brush I painted the stain on the areas I had sanded and also on the areas I wanted to have shadowing. Then I used a rag and gently wiped the stain. A little trick I learned is the amount of pressure you use in wiping away the stain with your rag matters!!! It became a technique!
Allow it to dry overnight.
Here is a pic of the finished legs~

The table is complete!!!
Subscribe to:
Posts (Atom)